Your Cart is Empty


If you’ve wanted to make coconut yogurt for a while but put it off thinking it was hard, or tried and was disappointed with the outcome, then this simple method is for you. It’s smooth, thick, rich, creamy and has just the right amount of tang. This coconut yogurt method doesn’t require any heating or added thickeners - it’s guaranteed to be a hit with paleo dieters, vegans, and foodies alike.
The trick with coconut yogurt is finding a reliable brand of canned coconut for the job and a starter culture that delivers loads of good bacteria for your gut. Of course, you also want the taste and texture to be as good (or better) than anything you can buy. We’ve done some testing and yum. Seriously, coconut yogurt can’t get much better than this!

Customers often ask us for starter culture recommendations. Mad Millie dairy-free yoghurt culture is made with more diversity than many starters on the market. It contains Streptococcus thermophiles, Lactobacillus delbrueckii subsp. bulgaricus, Bifidobacterium lactis and Lactobacillus acidophilus. The longer it ferments the higher the number of probiotics you’ll get in every spoonful.
We used Savoy coconut cream which has an excellent coconut flavour. We found it consistently thick and creamy in every can. No oil, and not too much water. Savoy coconut cream is a product of Thailand and tastes and performs a lot like Aroy-d coconut milk. Both are culinary favourites in restaurants across the world and is available online or in Asian supermarkets.
We hope this step by step recipe gives you the confidence to give homemade coconut yogurt a go. Let us know if you try it.

Fermentation time impacts both the number of probiotics in your coconut yogurt and the taste. The longer you ferment your coconut milk the more time the bacteria have to eat the sugar and proliferate and the more tart it will become. To maximise the probiotic potential, we recommend as long as 24-hour fermentation. For a sweeter yogurt choose 12-15 hours.
In dairy based yogurt production, bacteria in the starter culture eat the milk’s natural sugars, (lactose) during fermentation. Canned coconut milk doesn’t have as much natural sugar available to feed the bacteria and ensure the culturing process takes place. The starter culture must have plenty to feed on to ensure the culturing process continues for the full duration of the fermentation. One teaspoon of white sugar or one tablespoon of pasteurised honey is enough to kick start fermentation.
It is recommended that you sterilise your yogurt making jar and utensils beforehand. We have always found it is enough to wash in hot soapy water, then rinse in boiling water before use.

3 cans Savoy coconut cream (or Aroy-d coconut milk)
1 teaspoon sugar
½ sachet Mad Millie dairy free starter culture
1. Place the cans in the fridge overnight or in the freezer for 30 minutes prior to opening. Chilling the cans allows the cream content to set firm at the top allowing easy separation from the coconut water at the bottom.
2. Open the cans and spoon only the thick, white coconut cream into your glass yogurt making jar. The coconut water at the bottom of the can is not required. Don’t throw it away though - coconut water is wonderful added to smoothies, chia puddings & curries. Store the coconut water in the fridge for 2-3 days or freeze for several months. *If you find your coconut yogurt too thick, include some of the coconut water in your next batch.
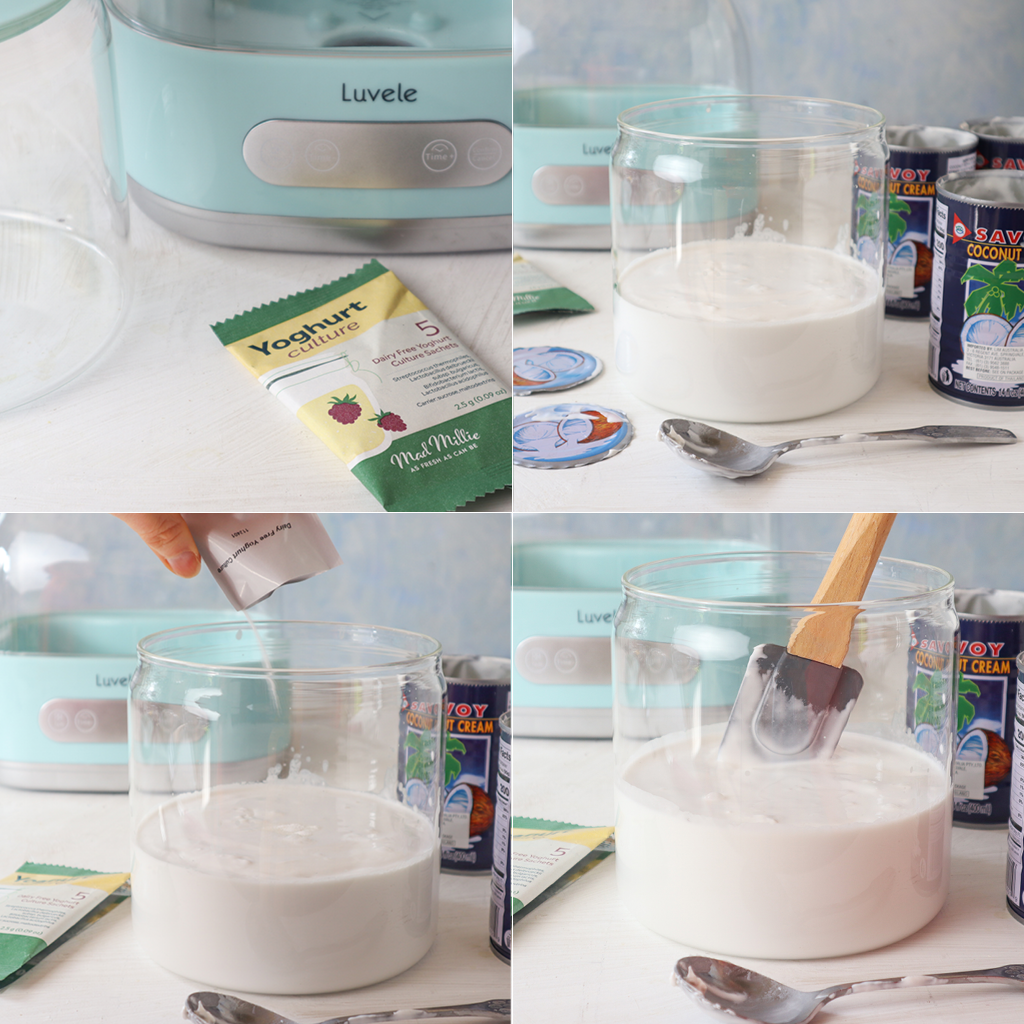
3. Add the starter culture and sugar or honey and stir it in. If the chilled coconut cream is too thick to stir easily. Don’t worry.
4. Put the lid firmly on the glass yogurt jar and place the jar into your yogurt maker. Pour water slowly into the base. (The water must not be filled over the ‘tall line’ indicated on the inside wall of the maker). Then place the cover lid on top.
5. Use the digital control panel to set the temperature to 38° C, the time to 24 hours and then press ‘confirm’ to begin incubation.
6. When complete, switch the maker off and place the jar of yogurt in the fridge for at least 6 hours to chill and set.The yogurt gets firmer the longer it is left in the fridge.
7. Give the yogurt a stir before serving.


